Managing Your Workspaces in PyQueryHub
Workspaces in PyQueryHub are your collaborative environment for data analysis and reporting. Each workspace provides a centralized place for teams to manage database connections, create reports, and control access to data and insights.
Creating a New Workspace
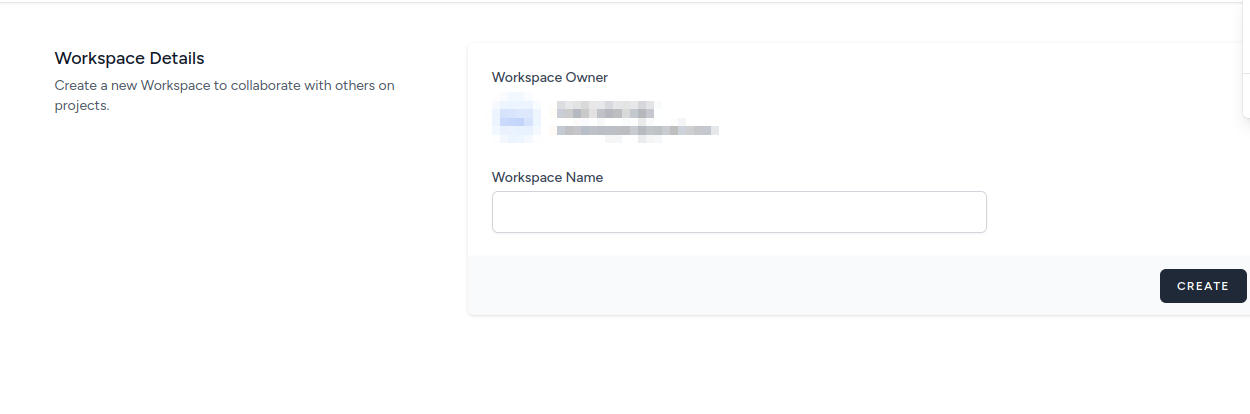
You can create a new workspace by clicking on your profile menu in the top-right corner and selecting "Create a Workspace."

When creating a workspace, you'll need to provide:
- Workspace Name: A descriptive name for your workspace (e.g., "Marketing Analytics", "Sales Dashboard")
- Workspace Owner: You'll automatically be set as the owner with full administrative rights
Workspace Settings
Access your workspace settings by clicking the settings icon in your workspace. The settings panel provides access to various configuration options:
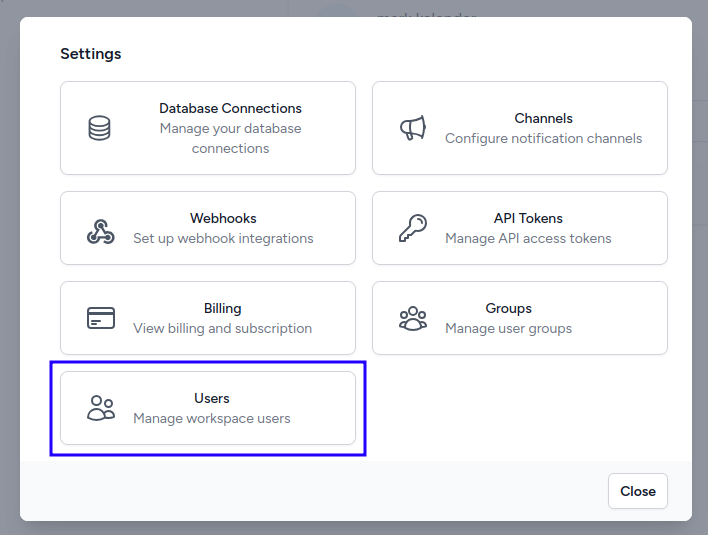
Available Settings Sections:
- Database Connections: Manage your database connections
- Channels: Configure notification channels (Email, Slack, etc.)
- Webhooks: Set up webhook integrations
- API Tokens: Manage API access tokens
- Billing: View billing and subscription information
- Groups: Manage user groups for organized access control
- Users: Manage workspace users and their roles
User Management
Adding Users to Your Workspace
Navigate to the "Users" section in workspace settings to manage your team members.
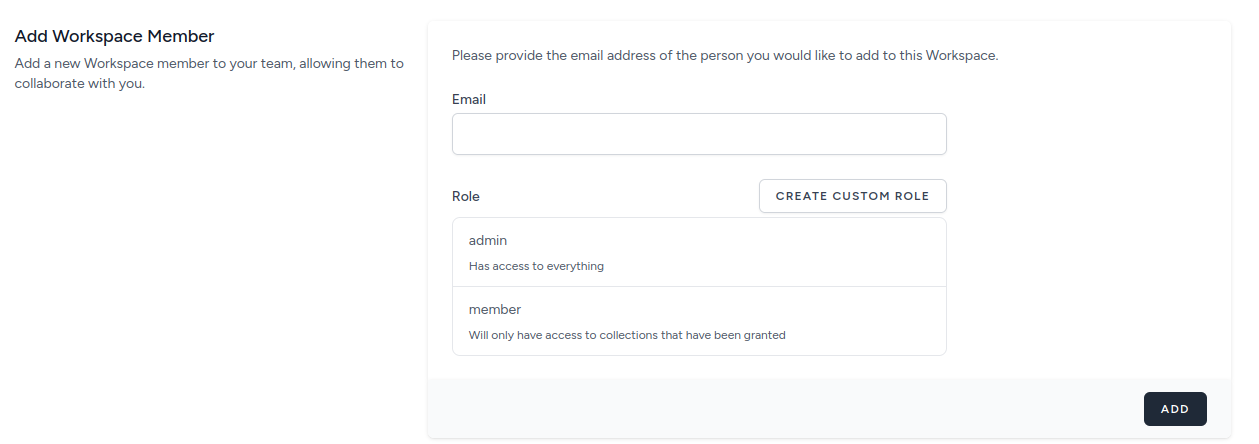
When inviting users, you can assign them different roles:
Available Roles:
- admin: Has access to everything in the workspace
- member: Will only have access to collections that have been granted
To add a new user:
- Enter their email address
- Select their role (admin or member)
- Click "ADD" to send the invitation
Users will receive an email invitation to join your workspace.
Role-Based Access Control
PyQueryHub uses a flexible role-based system:
- Administrator Role: Full control over the workspace, including user management, billing, database connections, and all reports
- Member Role: Limited access to specific collections and reports that have been explicitly shared with them
- Custom Roles: Create custom roles with specific permissions for different needs
You can also create custom roles by clicking "CREATE CUSTOM ROLE" when adding users, allowing you to define granular permissions for specific use cases.
Domain Claiming and SSO
Domain Verification
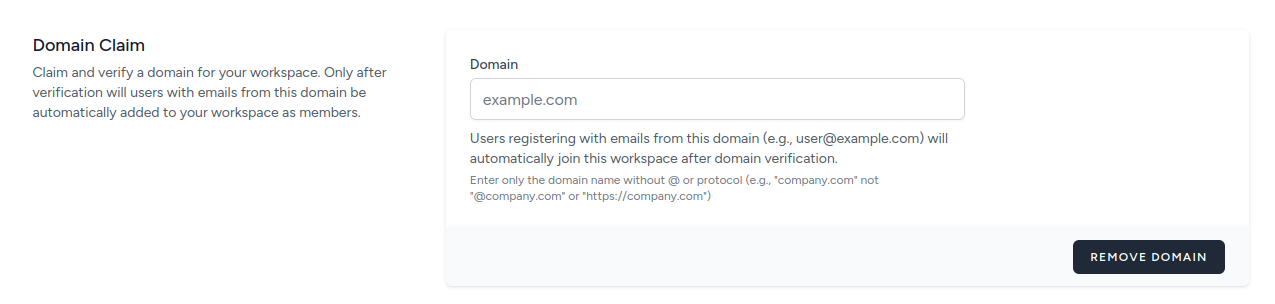
For enterprise use, you can claim and verify your company domain to enable automatic user onboarding and enhanced security.
To claim your domain:
- Navigate to workspace settings → Users section
- Enter your company domain (e.g.,
company.com) - Choose one of three verification methods:
Verification Methods:
DNS TXT Record (Recommended):
- Add a TXT record to your DNS settings
- Record name:
_pyqueryhub.company.com - Record value: Your unique verification token
- Wait 5-15 minutes for DNS propagation
TXT File Upload:
- Create a file named
pyqueryhub-domain-verification.txt - Add your verification token as the file content
- Upload to your website's public folder
- File should be accessible at
https://company.com/pyqueryhub-domain-verification.txt
HTML Meta Tag:
- Add a meta tag to your website's HTML head section
<meta name="pyqueryhub-domain-verification" content="your-token">- Tag should be present on your homepage
Once verified, users with email addresses from your domain will automatically be added to your workspace when they register.
Single Sign-On (SSO)
PyQueryHub supports Google OAuth for seamless authentication:
Google SSO Features:
- Users can sign up and log in using their Google accounts
- Automatic account linking for existing users
- Streamlined onboarding for invited users
- Works with domain verification for automatic workspace assignment
How Google SSO Works:
- Users click "Sign in with Google"
- They're redirected to Google for authentication
- Upon successful authentication, they're automatically:
- Logged into PyQueryHub
- Added to the appropriate workspace (if domain is verified)
- Assigned the correct role based on invitation or domain settings
For invited users, the SSO process will automatically accept their workspace invitation and assign the appropriate role.
Report Organization
Workspaces use Collections to organize reports and control access. Collections serve as folders that group related reports while providing granular access control.
Members with "member" role will only see collections that have been explicitly shared with them, while administrators have access to all collections in the workspace. Learn more about creating, managing, and sharing collections in the Collections documentation.
Workspace Collaboration Features
Groups Management
Create groups to organize users and simplify permission management:
- Department-based groups (Marketing, Sales, Engineering)
- Project-based groups (Q4 Analytics, Product Launch)
- Role-based groups (Analysts, Managers, Executives)
API Access
Generate API tokens for:
- Embedding reports in external applications
- Automated data updates
- Integration with other tools and services
Webhooks
Set up webhooks to notify external systems when:
- Reports are updated
- Data thresholds are met
- New insights are available
Best Practices
Workspace Organization:
- Use descriptive workspace names
- Set up collections to mirror your organizational structure
- Regularly review and update user permissions
Security:
- Verify your domain for automatic user onboarding
- Use appropriate roles to limit access to sensitive data
- Enable SSO for enhanced security and user experience
- Regularly audit user access and permissions
Collaboration:
- Create groups for easier permission management
- Use meaningful collection names and descriptions
- Set up appropriate notification channels for your team
Workspace Limits and Billing
Your workspace's subscription plan determines:
- Total number of users across all roles
- Available storage for reports and data
- API usage limits
- Advanced features availability
If you reach your user limit, you'll need to either upgrade your plan or remove existing users before adding new ones.
For questions about workspace management, user roles, or billing, contact our support team.