Alert Module User Guide
Introduction
The Alert Module helps you monitor key metrics in your reports and get notified when specific conditions are met. You can create custom alerts based on query results, define how often checks should run, and choose where notifications are sent.
Alerts List
On the Alerts page, you will find a table with the following columns:
-
Name: The name you gave the alert.
-
Last Run: Date and time when the system last checked this alert.
-
Last Trigger: Date and time when the alert last met its conditions and notifications were sent.
-
State: Current status:
- pending (no conditions met)
- triggered (conditions met in the most recent check)
-
Actions:
- View: Opens the Alert Details.
- Delete: Permanently removes the alert after confirmation.
To create a new alert, click Create Alert, enter a name, and press OK.
Alert Details and Configuration
When you View or Create an alert, you will see a configuration form split into sections.
1. Alert Name
- Change the name at any time by editing the Alert Name field.
2. Select Query
- Choose which report query to base this alert on. Each query corresponds to a data table of results.
3. Notification Channels
- Send Alert To: Select one or more channels (e.g., Email, Slack) where notifications should be delivered.
- The Available Channels are set in Channels
- Click Add to attach a channel to this alert.
- To remove a channel, click the × icon next to it.

4. Schedules
- Schedules are Query-specific to define. a Query schedule check the Query Scheduling in the Queries section.
5. Rules (Conditions)
Define the logic that triggers the alert based on individual data points.
-
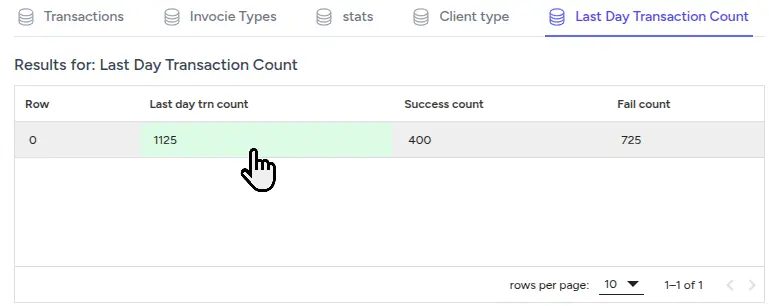
Select a Query Tab: Use the tabs at the top to switch between different queries and see their results.
-
Add a Rule: Click on any table cell whose value you want to monitor. A new row appears in the Rules section.
-
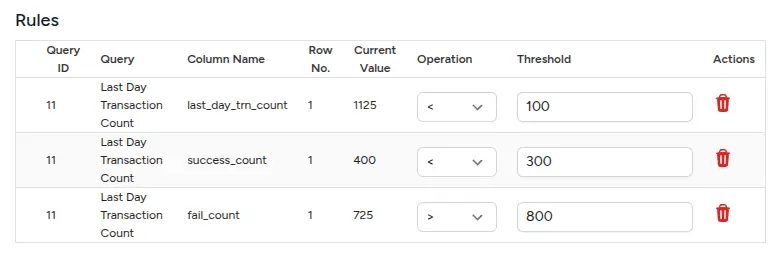
Configure the Rule:
- Column Name and Row No. are pre-filled based on your selection.
- Operation: Choose from
<,<=,=,!=,>,>=. - Threshold: Enter the comparison value.
-
Multiple Rules: You can add multiple rules. All must be met for the alert to trigger.
-
Remove a Rule: Click the trash icon in the Actions column for any rule.
6. Rearm Period (Cooldown)
Cooldown Interval (Rearm Seconds): Set a number of seconds to wait after an alert fires before allowing another notification.
- A non-zero value means the system treats the alert as if it "changed" after the cooldown expires, triggering a new notification if the condition remains true.
- If set to
0, notifications are always sent immediately when the alert condition is met.
Relationship to Query Schedule
- Alerts check only when the underlying query runs. If a query runs hourly, you can’t receive notifications more frequently than once per hour, regardless of the cooldown value.
- When queries run more frequently (e.g., every 15 minutes), choose a cooldown interval to avoid repetitive alerts.
Example Scenario
A report query runs every 30 minutes, and you set the cooldown interval to 1,800 seconds (30 minutes). The alert condition becomes true at 10:15 AM and remains true until 11:45 AM.
| Time | Alert Status | Notification Reason |
|---|---|---|
| 10:00 AM | OK | No notification (query ran, status OK) |
| 10:15 AM | Triggered | Condition met (first trigger) |
| 10:30 AM | Triggered | No notification (cooldown active) |
| 10:45 AM | Triggered | Condition still true, cooldown expired → notification sent |
| 11:00 AM | Triggered | No notification (new cooldown) |
| 11:15 AM | Triggered | No notification (cooldown active) |
| 11:30 AM | Triggered | Condition still true, cooldown expired → notification sent |
| 11:45 AM | OK | Status returned to OK → notification sent (status change) |
- Key Takeaway: Notifications occur at the first trigger, then at each cooldown interval if still triggered, and once when the status returns to OK.
7. Save and Cancel
- Click Save Alert to apply your changes.
- Click Cancel to discard changes and return to the Alerts List.
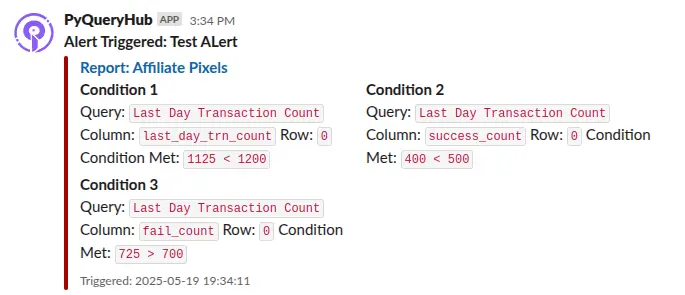
How Alerts Work
- A background job runs at each scheduled interval.
- It fetches the latest query results and evaluates your rules.
- If all rules pass and the rearm period has elapsed, a notification is sent to each configured channel.
Deleting Alerts
To delete an alert:
- On the Alerts List, click Delete next to the alert.
- Confirm in the pop-up prompt.
Sending Alerts from Notebooks
In addition to rule-based alerts, you can send notifications programmatically from Notebook cells using the built-in send_alert() function. This is useful for complex conditions that go beyond simple threshold rules — for example, statistical anomalies, multi-column checks, or custom business logic written in Python.
Usage
send_alert(channel, title, text, level)Parameters
| Parameter | Type | Required | Description |
|---|---|---|---|
channel |
string | Yes | The channel alias to send the alert to (e.g., 'slack', 'discord', 'telegram', 'email') |
title |
string | No | The alert title |
text |
string | Yes | The alert message content |
level |
string | No | Severity level: 'info', 'success', 'warning', or 'error' (default: 'info') |
Examples
Simple alert:
send_alert('slack', 'Daily Report', 'All metrics are within normal range.', 'success')Data-driven alert:
df = datasets["sales_query"]
total = df["revenue"].sum()

if total < 10000:
    send_alert('discord', 'Revenue Alert', f'Daily revenue is ${total:,.2f}, below the ,000 threshold.', 'warning')
else:
    send_alert('slack', 'Revenue Update', f'Daily revenue: ${total:,.2f}', 'success')
Multiple channels:
message = f'Found {len(anomalies)} data anomalies in the latest batch.'
send_alert('slack', 'Data Quality', message, 'error')
send_alert('email', 'Data Quality', message, 'error')
Note: Channels must be configured before use. See Channels for setup instructions. When combined with Query Scheduling, you can automate notebook execution and send alerts on a recurring basis.
Tips and Best Practices
- Clear Names: Use descriptive names so you can identify alerts quickly.
- Moderate Frequency: Set schedules no more often than needed to avoid excessive checks.
- Combine Rules: Use multiple rules to narrow down exactly when you want to be notified.
Support
For further assistance, contact your administrator or visit the help center.